Hamster Cage Cleaning Made Simple

Written by
Kailani Okoro
Reviewed by
Prof. Henry Webster, Ph.D.Cleaning the hamster cage correctly will maintain scent markers which can help with anxiety and stress levels
Daily spot cleaning areas of urine to keep the cage from smelling completely removes any issues of hygiene
Only perform a full clean every 2-3 months (unless health issues demand otherwise)
Only use vinegar solutions and not household disinfectants as some can cause respiratory damage
Retain up to 30% of the old bedding to help provide some territorial scent security
Cleaning habits should be based on your individual hamster's behavior, and not scheduled cleaning routines
Article Navigation
Correct hamster cage cleaning is essential to your pet's health and stress reduction. I learned this the hard way when my first dwarf hamster had respiratory trouble from using harsh cleaners. Scent markers must be preserved in the bedding. These scents are reassuring and help alleviate the anxiety a hamster may feel.
The different hamster species require different approaches. My Syrian hamster needed sand baths less often than the dwarf types. These dwarf species require daily access to sand for grooming their fur. The Syrians needed more attention to the nesting scents. Adjust the sand bath sessions to fit their own biological needs.
Good cleaning prevents respiratory infections and skin problems. I was also able to note a better coat and appetite in the animals after improving my methods. Your hamster will show more natural behavior. Regular habits inspire trust and confidence between you and your little friend.
Hairless and Long-Haired Care
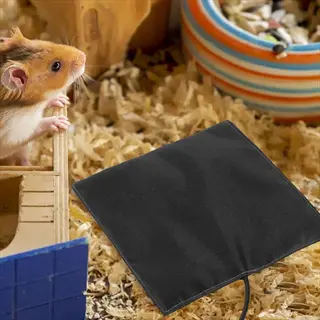
Hairless hamsters have special skin care needs; apply a rice grain-sized drop of coconut oil to their skin weekly to prevent dryness. I found this out after my hairless hamster developed flaky skin. Maintain their habitat at a social temperature of 68-75°F (20-24°C), as they have no fur to keep them warm. The drop in temperature can lead to health problems quickly.
Long-haired breeds require frequent grooming. Use Kaytee combs made of soft material about every 3 days to prevent mats. I spend about 5 minutes grooming my long-haired Syrian each day. Concentrate on the rear fur where there is a tendency for tangles. Use gentle handling to avoid stressing the pets while grooming.
Bathing habits differ totally between the different kinds of hamsters. Hairless hamsters should never be bathed in water, because their delicate skin requires oil. Long-haired hamsters need to have sand baths occasionally to keep their fur clean. I give my furry babies chinchilla sand in a shallow dish.
Cage cleaning has different conditions as well. Hairless habitats require softer bedding such as paper strips to avoid irritation of their skin. Long-haired cages will require spot cleaning more frequently to remove loose hair. I alter what I do due to the special needs of each hamster I care for.

Hairless Hamsters
- Apply coconut oil weekly using fingertip: equivalent to one rice grain prevents skin dryness without residue buildup
- Monitor for skin irritations during handling: lack of fur increases vulnerability to scrapes and environmental factors
- Maintain consistent habitat temperature: fluctuations below 68°F (20°C) cause discomfort due to missing insulation

Long-Haired Hamsters
- Brush weekly with fine-tooth comb: gently work from head to tail removing trapped bedding and food particles
- Trim fur near hindquarters monthly: prevents fecal matter accumulation using blunt-nosed pet scissors
- Avoid sticky bedding types: paper-based substrates reduce tangling compared to wood shavings or cotton fluff

Hairless Skin Moisturizing
- Apply coconut oil weekly using a fingertip: Use an amount equivalent to one rice grain to prevent skin dryness without causing residue buildup on delicate skin tissues
- Massage gently into exposed skin areas: Focus on elbows and hindquarters where friction may cause dryness during normal cage activities and movements
- Avoid petroleum-based products entirely: Coconut oil is naturally antibacterial and won't clog pores unlike synthetic moisturizers which risk irritation
- Monitor for allergic reactions closely: Discontinue use if redness or itching develops and consult a veterinarian for alternative solutions promptly
- Time applications after active periods: Apply during your hamster's waking hours to allow full absorption before they return to nesting or sleeping
- Store coconut oil properly: Keep in a cool dark place to maintain freshness and prevent rancidity that could harm sensitive skin
Temperature Management
- Maintain habitat at 68-75°F (20-24°C) consistently: Use a digital thermometer to monitor daily since hairless hamsters lack insulating fur protection
- Provide a ceramic heating tile safely: Place under one cage corner to create a warm zone without overheating the entire enclosure space
- Avoid direct sunlight exposure completely: Position the cage away from windows to prevent dangerous temperature fluctuations throughout daylight hours
- Check for temperature gradients: Ensure your hamster can move between warmer and cooler areas to self-regulate their body temperature effectively
- Use thermostat-controlled devices: Connect heating pads to thermostats to automatically maintain safe ranges during nighttime drops in temperature
- Observe behavioral cues regularly: Look for shivering or lethargy which indicate discomfort requiring immediate environmental adjustments
Bedding Selection
- Choose dust-free paper bedding exclusively: Aspen shavings can cause micro-cuts while paper products cushion delicate skin without abrasion risks
- Layer 4+ inches for proper burrowing: Allows natural nesting behaviors without skin abrasion from cage flooring materials or hard surfaces
- Spot-clean damp sections immediately: Remove urine-soaked areas daily since lack of fur barrier makes skin more vulnerable to irritation
- Avoid scented bedding products: Fragrances can trigger respiratory issues in hairless varieties with heightened sensitivity to chemicals
- Provide extra nesting material: Offer unscented toilet paper strips for additional insulation against cold surfaces in the habitat
- Replace bedding monthly: Even with spot cleaning, full changes prevent bacterial buildup that could infect unprotected skin

Health Monitoring
- Check for redness weekly during handling: Gently examine skin folds for early signs of infection or mites which spread quickly without fur
- Watch for excessive scratching behaviors: May indicate dry skin needing extra oil application or environmental humidity adjustments
- Weigh monthly using a gram scale: Track weight changes since hairless varieties burn more calories maintaining body heat than furred counterparts
- Inspect paws daily for injuries: Lack of fur makes feet vulnerable to scrapes from rough surfaces or abrasive bedding materials
- Note changes in activity levels: Reduced movement could indicate temperature discomfort or early signs of health issues needing attention
- Schedule quarterly vet checkups: Professional assessments help catch skin conditions early before they become serious problems

Handling Precautions
- Support full body with both hands: Cup gently to distribute weight evenly and minimize pressure points on delicate bare skin
- Limit handling sessions to 5 minutes: Prevent excessive heat loss through skin contact during extended interaction periods with humans
- Wash hands thoroughly before contact: Remove lotions or scents that could transfer to sensitive respiratory systems or irritate skin
- Avoid handling during sleep cycles: Waking suddenly causes stress that may trigger defensive biting due to heightened vulnerability
- Use a soft scoop for transfers: Minimize skin contact when moving between habitats during cleaning routines or health checks
- Create calm environments: Reduce loud noises and sudden movements that could startle unprotected hamsters during interactions

Brushing Techniques
- Use fine-tooth metal comb weekly: Gently detangle fur starting from ends working toward roots to avoid pulling skin or causing discomfort
- Focus on hindquarters specifically: This area commonly collects bedding material in long fur requiring extra attention during grooming
- Check behind ears regularly: A common trouble spot where mats form easily and need careful detangling during brushing sessions
- Brush before spot cleaning: Remove loose fur first to prevent it from mixing with bedding and creating larger tangles later
- Apply cornstarch to stubborn mats: Helps loosen knots naturally before combing without resorting to cutting or pulling fur
- Reward with treats after grooming: Associate brushing with positive experiences to reduce stress during future sessions

Fur Trimming
- Trim hindquarter fur monthly: Use rounded-tip scissors carefully to prevent fecal matter buildup in long-haired varieties' fur
- Maintain 0.5 inch length minimum: Short enough for hygiene but long enough to provide natural insulation and skin protection
- Avoid face trimming completely: Never cut whiskers which are vital sensory organs for navigation and environmental exploration
- Work during active hours: Trim when hamster is naturally awake and alert to minimize stress and accidental movements
- Have styptic powder ready: In case of minor nicks during trimming to quickly stop any bleeding from accidental cuts
- Check trimmed areas daily: Ensure no irritation develops and fur regrows properly without ingrown hairs or skin issues
Bathing Alternatives
- Provide chinchilla sand weekly: Dwarf varieties roll to clean fur while Syrians may need dusting to manage natural oils
- Spot-clean soiled patches gently: Use damp cloth instead of full baths which strip essential protective oils from the coat
- Dry thoroughly after any moisture: Pat immediately with towel to prevent chilling and matting that can lead to skin issues
- Use unscented baby wipes: For quick cleanups between full grooming sessions without overwhelming your hamster's senses
- Avoid water immersion completely: Hamsters don't swim naturally and water exposure causes extreme stress and health risks
- Monitor sand bath usage: Ensure your hamster doesn't ingest large amounts of sand during cleaning activities

Mat Prevention
- Remove sticky foods immediately: Avoid honey-coated treats that glue fur together causing painful pulling on skin tissues
- Choose smooth paper-based bedding: Reduces friction tangles compared to wood shavings which can snag long fur strands
- Check paw fur daily: Long hair between toes collects debris leading to mobility issues if left unchecked over time
- Brush after feeding sessions: Prevent food particles from drying in fur and creating mats that are difficult to remove
- Provide rough surfaces naturally: Terra cotta pots or stone slabs help wear down fur edges and reduce mat formation
- Inspect nesting areas weekly: Remove packed bedding that could create friction mats in your hamster's coat over time

Seasonal Adjustments
- Increase winter grooming frequency: Static electricity causes more matting in dry heated indoor environments during cold months
- Reduce summer trimming sessions: Longer fur provides insulation against air conditioning drafts in warmer seasons
- Monitor humidity levels carefully: Maintain 40-60% range to prevent skin dryness without encouraging fungal growth problems
- Adjust heating pad settings: Increase winter temperatures slightly to compensate for lower ambient room conditions
- Provide cooling stones in summer: Natural slate tiles offer cool surfaces to prevent overheating in long-haired varieties
- Modify bedding depth seasonally: Add extra layers in winter for insulation while reducing slightly in humid summer months
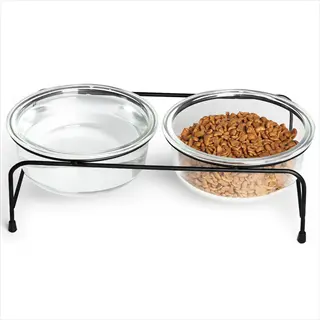
Water and Food Dish Hygiene
The choice between ceramic and plastic dishes can affect your hamster's health. Ceramic has a less porous surface that resists bacteria. Plastic is easily scratched and can trap germs in the scratches. I found a slimy substance building up on my hamster's plastic bowl, so I switched to a ceramic dish. It is also important to look for FDA-approved food-safe sealants, such as glazes with no lead content.
Disinfect dishes weekly using a 1:1 vinegar-water solution. Combine equal parts of white vinegar and water in a bowl. Soak items for 10 minutes, then rinse well. This kills bacteria without dangerous products. I do this for my hamster's ceramic dishes every Sunday.
Temperature plays a role in cleaning. Plastic becomes distorted above 120°F (49 °C). Ceramic is safe up to 150°F. Boiling water is excellent for sanitizing stainless steel bowls. A plastic wheel was ruined by hot water. Now I pay particular close attention to temperatures.
Use only ceramic dishes marked *food safe*. The FDA requires non-toxic sealers that do not leach chemicals. Check for compliance statements on the package. My hamster's ceramic bowl features a symbol indicating the type of glaze used. This avoids contamination of food by heavy metals.
Food Bowls
- Empty all leftover food particles completely before washing to prevent bacterial growth in small crevices where moisture accumulates
- Wash thoroughly with unscented dish soap and lukewarm water using a dedicated soft-bristle brush reserved only for pet dish cleaning purposes
- Rinse continuously for at least thirty seconds under running water to ensure absolutely no soap residue remains that could potentially contaminate fresh food
- Air-dry dishes upside down on a clean towel placed away from kitchen contaminants until completely moisture-free before reuse
- Sanitize weekly by soaking in equal parts water and white vinegar solution for ten minutes followed by thorough rinsing to eliminate odors
- Inspect carefully for hairline cracks monthly since damaged surfaces can harbor dangerous bacteria colonies requiring immediate replacement
Water Bottles
- Rinse bottle nozzles daily with hot water to prevent the formation of bacterial biofilm inside narrow drinking tubes where pathogens multiply
- Use specialized fuzzy-straw brushes weekly to scrub interior surfaces thoroughly reaching areas inaccessible to regular cleaning tools
- Disinfect monthly by submerging completely in boiling water for five full minutes to kill stubborn pathogens resistant to normal washing
- Replace rubber seals and gaskets quarterly to prevent leakage problems and bacterial buildup in worn components that degrade over time
- Test water flow rate after every cleaning session to ensure proper delivery without blockages or constant dripping that wastes water
- Avoid dishwasher use entirely since high heat warps plastic components and damages metal parts beyond repair permanently
Food Storage Containers
- Wash containers after every single refill to remove old food residue before adding fresh portions preventing mold and bacterial contamination
- Use glass or stainless steel containers rather than plastic options which absorb oils and develop persistent odors that transfer to food
- Sanitize weekly using diluted bleach solution with one tablespoon bleach per gallon of water soaked for fifteen minutes then rinsed well
- Dry containers completely before refilling since even small amounts of moisture accelerate food spoilage and encourage bacterial growth problems
- Label containers clearly with expiration dates to track when opened packages should be replaced maintaining optimal freshness and nutrition levels
- Store in consistently cool dark locations away from direct sunlight and heat sources preserving nutritional value and preventing premature spoilage
Travel Feeding Solutions
- Clean collapsible bowls with pet-safe disinfectant wipes both before and after trips to eliminate germs acquired during transportation periods
- Pack multiple extra containers allowing you to always have clean backups available when traveling without access to proper washing facilities
- Use spill-proof designs featuring screw-top bottles and secure lidded bowls preventing contamination inside carriers during bumpy transportation situations
- Avoid communal water sources completely by bringing sufficient bottled water from home instead of using potentially contaminated public fountains
- Dry all components thoroughly between uses by shaking out excess water and air-drying completely before packing away in travel bags
- Inspect carefully for damage after each trip checking for cracks or warping caused by temperature changes during transport compromising safety
Specialty Bottle Accessories
- Clean sipper tubes weekly using flexible pipe cleaners designed to remove algae buildup in narrow drinking channels where brushes cannot reach
- Replace silicone valves and gaskets monthly since worn parts cause leaks and harbor bacteria in textured surfaces impossible to clean properly
- Disinfect bottle holders and cage-mounted brackets weekly where moisture accumulates unnoticed creating ideal environments for bacterial growth colonies
- Remove mineral deposits monthly using citric acid solution when hard water causes scaling that reduces water flow and breeds bacteria
- Rotate backup bottles systematically using different bottles each week ensuring all receive regular deep cleaning maintaining consistent hygiene standards
- Inspect mounting systems weekly tightening loose brackets that could cause spills leading to wet bedding and potential fungal contamination issues

Ceramic Dishes
- Heavy ceramic construction resists tipping effectively preventing food spills during active hamster feeding sessions and maintaining stable positioning
- Non-porous glazed surfaces inhibit bacterial penetration allowing more effective deep cleaning over time compared to porous material alternatives
- Dishwasher-safe options tolerate high temperatures up to 150°F (65°C) without cracking risks when manufacturer guidelines are followed precisely
- Require lead-free certification ensuring FDA-compliant glazes prevent toxic heavy metal contamination from leaching into food or water
- Present chipping hazards requiring immediate replacement when cracks appear since sharp edges can injure delicate mouths during feeding
- Ideal weight ranges between four to six ounces providing sufficient stability without being excessively heavy for regular cage rearrangement
Stainless Steel Bowls
- Naturally antibacterial properties significantly reduce pathogen growth making this the most hygienic material choice for long-term food safety
- Chew-proof construction deters destructive hamsters from damaging dishes during enthusiastic feeding times maintaining functionality over years
- Tolerate boiling-water sterilization monthly without warping or material degradation ensuring thorough deep cleaning capability when needed
- Feature non-slip silicone bases preventing sliding while requiring weekly detachment for proper cleaning underneath adhesion surfaces
- Reflective surfaces may initially startle sensitive hamsters requiring gradual introduction with familiar scents to build comfortable acceptance
- Lightweight two to three ounce models work well for multi-level cage installations where heavier options prove impractical

Plastic Containers
- Economical lightweight designs allow easy replacement but microscopic scratches harbor bacteria requiring particularly vigilant cleaning maintenance routines
- Avoid colored varieties completely since dyes can leach into food selecting only FDA-approved food-grade white plastic versions
- Maximum safe cleaning temperature is 120°F (49°C) since warping occurs above this threshold during hot water washing processes
- Require monthly replacement schedules because microscopic scratches necessitate frequent swapping to maintain proper hygiene standards consistently
- Essential BPA-free verification prevents endocrine disruptors from contaminating food sources and causing long-term health complications
- Serve best as temporary solutions suitable for travel carriers rather than primary habitat installations requiring daily cleaning
Glass Dishes
- Ultra-non-porous surfaces provide maximum bacteria resistance but present fragility concerns creating potential dangers if breakage occurs
- Crystal-clear transparency allows easy visual inspection of cleanliness levels and food contamination without moving the dish
- Thermal shock risks necessitate avoiding sudden temperature changes during washing routines preventing dangerous cracking incidents
- Require fire-polished smooth edges preventing mouth injuries during enthusiastic feeding activities by eliminating sharp contact points
- Need heavy bases weighing at least six ounces preventing tipping incidents caused by active dwarf hamsters climbing
- Demand special handling precautions always placing on solid surfaces rather than elevated platforms preventing dangerous falls

Gravity Feeders
- Self-refilling designs maintain constant food supply convenience but require complete weekly disassembly for proper cleaning maintenance
- Clean hoppers monthly removing all food particles and scrubbing interior surfaces preventing stale food buildup in corners
- Check dispensing mechanisms regularly ensuring no blockages exist in chutes where hidden mold can develop undetected
- Avoid plastic versions completely choosing stainless steel or ceramic models for superior hygiene and easier maintenance
- Monitor food freshness diligently replacing contents every three days maximum preventing oils from turning rancid over time
- Position carefully away from bedding areas maintaining sufficient clearance preventing contamination from waste materials below

No-Tip Designs
- Weighted bases typically eight to ten ounces effectively resist flipping during enthusiastic digging activities near food stations
- Silicone sealing rings create vacuum suction requiring weekly removal for cleaning debris trapped underneath adhesion surfaces
- Dishwasher-safe options withstand high temperatures up to 160°F (71°C) when manufacturers specify appropriate material tolerance
- Check carefully for food traps ensuring no gaps exist between bowl and base where crumbs accumulate developing mold
- Smooth transition edges prevent food from lodging in crevices during natural hamster feeding behaviors promoting cleanliness
- Ideal solutions for young hamsters preventing messes caused by playful juveniles enthusiastically exploring their food dishes

Foraging Dishes
- Multi-compartment designs require daily disassembly cleaning between sections where moisture causes hidden mold growth problems
- Avoid wooden components completely since porous materials absorb urine and cannot undergo proper sanitization procedures effectively
- Choose dishwasher-safe metal versions with stainless steel construction withstanding frequent cleaning without material degradation issues
- Check meticulously for sharp edges filing down any rough spots preventing paw injuries during enthusiastic food searches
- Sanitize weekly using pet-safe disinfectants killing bacteria in puzzle grooves and textured crevices retaining contamination
- Rotate styles monthly preventing bacterial adaptation to specific dish surfaces maintaining effective hygiene management

Hanging Feeders
- Cage-mounted systems keep food elevated conveniently but require daily crumb removal from cage floors beneath the installation
- Detachable bowls prove essential for thorough cleaning of both dish surfaces and mounting hardware where grime accumulates
- Check attachment hooks weekly straightening bent wires that trap food particles developing bacterial colonies over time
- Avoid natural fiber rope materials completely since they harbor bacteria and resist proper disinfection procedures effectively
- Choose stainless steel chain options exclusively withstanding boiling water sterilization without corrosion or degradation problems
- Position maintaining minimum six-inch clearance above bedding preventing waste contamination while allowing comfortable access

Heated Dishes
- Winter-specific use maintains food temperature comfort but requires unplugging during all cleaning cycles preventing electrical hazards
- Require waterproof electrical components with sealed connections preventing liquid damage during necessary washing maintenance routines
- Wipe surfaces daily using damp cloths carefully avoiding electrical contact points that could cause dangerous short circuits
- Deep-clean monthly disconnecting power first then washing non-electronic parts exclusively in soapy water solutions
- Inspect power cords weekly checking for chew damage that could expose wires creating potentially lethal hazard situations
- Store offseason in dry locations with silica gel packs preventing moisture damage during extended non-use periods

Portable Sets
- Collapsible silicone bowls offer convenience but require complete unfolding during cleaning reaching creases accumulating hidden grime
- Snap-lid containers prevent spills effectively but trap moisture needing thorough drying procedures after every washing session
- Include dedicated travel brushes allowing on-the-go cleaning using bottled water sources when conventional washing isn't possible
- Disinfect after every trip soaking in vinegar solution for fifteen minutes minimum eliminating travel-acquired contaminants
- Check wear patterns regularly replacing sets when surfaces become cloudy or develop permanent odors resisting elimination
- Store completely unfolded preventing mold growth in damp folded creases maintaining long-term hygiene between uses
Sand Baths for Dwarf Hamsters
For optimal grooming, dwarf hamsters require a special sand called chinchilla sand. This sand will clean the coats of their fur without any irritation to their skin. I use this sand daily for my dwarf hamsters. A good substitute for quartz sand is any other type of sand as long as it is not dusty, which is injurious to the lungs.
Each day, sift the sand with a 1mm mesh kitchen strainer. This allows for the removal of waste while keeping the sand clean. I do this every morning for my hamsters. The fine mesh will catch the soiled clumps while allowing the clean, good sand to pass through. The proper sifting will keep the bacterial growth away.
Once a month, wash the dirty sand. Rinse it in a bucket until the water is clear. Do not spread the wet sand too thickly on baking sheets. Sun it for four hours in the sunshine. This I do on sunny weekends. The sand is sure to dry thoroughly; otherwise, there may be molds.
Locate sand baths in the vicinity of where the hamsters sleep. The preferred temperature range is 68-75°F (20-24°C). My baths are situated next to the nests themselves. Dwarf hamsters tend to prefer bathing shortly after they wake up. Try to avoid locating the sand baths in places that might be too loud or where individuals might be startled during body care.
Daily Sifting Routine
- Sift sand daily using a fine-mesh kitchen strainer with holes smaller than 1mm to efficiently remove all soiled clumps and waste materials
- Check thoroughly for damp spots particularly in corners where urine tends to accumulate requiring immediate removal to prevent bacterial growth
- Stir sand completely redistributing clean particles while maintaining consistent texture depth of at least 2 inches throughout the entire bath
Weekly Deep Cleaning
- Transfer sand to a large bucket rinsing under running water while stirring continuously until the water runs completely clear indicating removal of contaminants
- Drain excess water using cheesecloth or a fine sieve allowing sand to retain minimal moisture while preventing clumping during drying processes
- Spread sand thinly on baking sheets requiring at least four hours of direct sunlight exposure achieving complete drying before returning to habitat
Container Selection
- Choose ceramic or glass dishes with minimum 4-inch depth and 6-inch width allowing proper rolling space for dwarf species to perform bathing behaviors
- Ensure containers feature smooth rounded edges preventing skin abrasions during enthusiastic rolling sessions common among active dwarf hamsters
- Select sizes between 6-8 inches diameter providing adequate territory without dominating cage space while accommodating multiple hamsters when needed
Placement Strategy
- Position baths near sleeping areas since dwarf hamsters instinctively prefer cleaning immediately upon waking before engaging in other activities
- Maintain ambient temperature between 68-75°F (20-24°C) preventing chilling during post-bath grooming when fur is fluffed and most vulnerable
- Avoid high-traffic zones reducing stress during vulnerable bathing periods especially for shy Roborovski or hybrid dwarf hamster varieties
Sand Replacement
- Replace entire sand volume monthly even with regular cleaning to prevent bacterial accumulation that standard sifting cannot fully eliminate
- Transition gradually using a 25% new to 75% old sand ratio maintaining familiar scent markers that encourage consistent bathing behaviors
- Store unused sand in airtight containers preventing moisture absorption and preserving freshness while noting quartz sand as a safe alternative option
The Right Way to Deep Clean
Retaining 30% old bedding during swapping will ensure scent markers remain. This reassures your hamster as familiar smells are kept. Before removing dirty areas, I use chopsticks to mark out sections of clean bedding, maintaining this scent. In my opinion, mixing the old with the new bedding decreases the stress of moving extremely effectively.
To clean the cage base, combine 1 tablespoon of soap per quart of warm water. At this dilution, the soap will effectively cut through grime without leaving a residue. I use unscented dish soap and a soft cloth. Apply a gentle scrubbing action, concentrating on the urine stains, and avoiding strong abrasive materials.
Before you take everything apart, measure where things are. I take a picture of how far the wheel is hidden. By putting things back in the same spot, it helps to keep your hamster's mind active and area intact. This will help prevent the hamster from being startled after cleaning. My hamster wanders around confidently when all is in order.
Be absolutely certain that the environment is entirely dry at 70°F (21°C) or greater before reintroducing them. Moisture can cause respiratory problems; therefore, I recommend placing a space heater in the closet during winter to maintain a suitable temperature. The surfaces dry out to prevent mold growth while keeping your hamster comfortable and healthy.
Preparation Phase
- Prepare temporary habitat maintaining 68-75°F (20-24°C): Set up secure carrier with familiar bedding and hideaways to minimize relocation stress during cleaning
- Remove hamster using scoop method: Gently guide into carrier rather than grabbing to prevent panic responses that could lead to defensive biting
- Document layout precisely: Take reference photos measuring exact distances between items ensuring millimeter-perfect replacement post-cleaning
Substrate Management
- Retain 30% clean bedding: Preserve unsoiled material from top layers maintaining essential scent markers crucial for territorial security and stress reduction
- Dispose of soiled bedding immediately: Seal in airtight bags preventing airborne particles from contaminating clean areas during the cleaning process
- Blend old and new substrate: Mix retained bedding with fresh material using strict 70% new to 30% old ratio ensuring scent continuity throughout habitat
Cage Base Cleaning
- Scrub with mild solution: Use unscented dish soap diluted to 1 tablespoon per quart of lukewarm water avoiding abrasive tools that scratch surfaces
- Target soiled areas methodically: Focus on corners and edges where urine residue accumulates using soft-bristle toothbrushes for tight crevices
- Rinse thoroughly: Wipe down with multiple water-dampened microfiber cloths until absolutely no soap residue remains visible or detectable by touch
- Perform deep cleans only when necessary: Limit to every 2-3 months unless medical issues like mites or fungal infections require more frequent intervention
Accessory Handling
- Clean items separately: Wash wheels and hides in distinct containers preventing cross-contamination between objects during the sanitization process
- Maintain scent familiarity: Avoid washing nest materials entirely; spot-clean only unless medically necessary for specific health-related circumstances
- Air-dry completely: Position items on clean towels in well-ventilated areas maintaining minimum 70°F (21°C) ambient temperature ensuring rapid drying
Reassembly Rules
- Replace items identically: Use pre-cleaning documentation to restore exact positions of hides, wheels, and enrichment items
- Layer bedding progressively: Add substrate in 2-inch increments compacting gently to support natural burrowing behaviors
- Reintroduce hamster gradually: Place carrier inside cleaned cage allowing self-emergence when comfortable with new environment
Reassembly and Reintroduction
- Replace items identically: Use pre-cleaning measurements and photos to restore exact positions of all hides, wheels, and enrichment objects
- Layer bedding progressively: Add substrate in 2-inch increments compacting gently to support natural burrowing behaviors without collapsing tunnels
- Reintroduce gradually: Place carrier inside cleaned cage allowing hamster to self-emerge when comfortable while monitoring for stress signs 24 hours post-transfer
- Observe stress indicators: Watch for bar-chewing or excessive grooming indicating anxiety requiring environmental adjustments to restore comfort levels
Daily Spot Cleaning Routine
Use a 365nm UV flashlight to find urine spots quickly at night. This wavelength shows things that regular lighting won't. I scan the corners of my hamster cage every night. It tells exactly where to clean without the guesswork. Targeted cleaning cuts down on bedding and also cuts down on stress.
Clean wheels differently based on the material. Plastic wheels require daily wiping with a moist cloth. Cork wheels need weekly nice scrubbing with a vinegar solution. Cork wheels require overnight drying with air. Approximately an hour is sufficient for drying plastic.
Check bedding moisture with finger compaction tests. Press your fingers about two inches into the bedding; if it feels wet or clumpy, spot clean that area. I do this test twice a day. Dry bedding prevents mold and keeps your hamster healthy.
Utilize time-saving devices, such as small vacuums with HEPA filters, to rapidly remove loose bedding and food debris. I also suggest ergonomic angled scoops for cleaning corners. These devices cut cleaning time in half and are gentle on habitats.
Urine Spot Identification
- Use 365nm UV flashlight nightly: Scan corners and wheel surfaces detecting invisible urine stains that indicate areas requiring immediate cleaning attention
- Check established toilet zones systematically: Focus on litter trays or sand baths where hamsters typically eliminate based on observed behavioral patterns
- Conduct sniff tests on damp bedding: Detect ammonia odors signaling urine saturation requiring removal down to the cage base level completely
Wheel Maintenance
- Wipe plastic surfaces daily with damp microfiber cloths: Remove urine and feces buildup before it dries and hardens overnight causing bacterial growth
- Scrub cork wheels weekly using soft brushes: Clean with safe vinegar solution (1:3 vinegar-water ratio) preserving material integrity while preventing mold
- Rotate spare wheels strategically: Maintain two identical wheels allowing daily swaps while the used one air-dries completely overnight in well-ventilated areas
- Check for residue buildup monthly: Run fingers along running surfaces detecting sticky patches needing enzymatic cleaners for thorough removal
Litter Tray Management
- Scoop solids twice daily using specialized scoops: Remove feces maintaining hygiene in high-use toilet areas while preserving scent markers
- Stir absorbent materials thoroughly: Redistribute chinchilla sand or paper pellets ensuring even absorption throughout the entire tray surface area
- Replace 30% material weekly: Refresh while retaining soiled sand preserving scent markers that encourage consistent toilet area usage patterns
- Disinfect trays monthly safely: Soak in boiling water eliminating bacteria after ensuring vinegar solutions are fully rinsed to prevent respiratory irritation
Food Area Hygiene
- Remove fresh food remnants within two hours: Clear uneaten vegetables promptly preventing spoilage and fruit fly infestations in warm environments
- Sift dry food storage using fine-mesh strainers: Separate debris from hoarded food preserving edible portions while discarding contaminated waste material
- Wipe ceramic food platforms daily: Clean surfaces with damp cloths eliminating seed casings and food dust accumulation that attracts pests
- Rotate food stash positions gently: Shift hoard locations allowing air circulation preventing mold growth in densely packed food piles over time
Efficiency Tools
- Use mini cordless vacuum: Quickly remove loose bedding and food debris from flat surfaces saving manual sweeping time
- Employ angled scoops: Reach corner urine spots without disturbing surrounding clean bedding areas unnecessarily
- Maintain cleaning caddy: Organize dedicated hamster tools including UV light, gloves, and enzyme cleaner for quick access
- Schedule consistent timing: Perform spot cleans during hamster sleep cycles minimizing disruption to natural activity patterns
Efficiency Tools & Techniques
- Use mini cordless vacuums with HEPA filters: Quickly remove loose bedding and food debris from flat surfaces saving manual sweeping time effectively
- Employ angled scoops precisely: Reach corner urine spots without disturbing surrounding clean bedding areas unnecessarily during spot cleaning routines
- Maintain organized cleaning caddies: Store dedicated hamster tools including UV light, gloves, and enzyme cleaners for immediate access when needed
- Perform moisture compaction tests: Press fingers 2 inches into bedding checking for dampness indicating areas needing immediate spot cleaning attention
5 Common Myths
To prevent illness and promote good hygiene for your hamster and its overall health and well being, cages should be cleaned in their entirety on a weekly basis.
This is incorrect in that total cage cleaning destroys vital scent markers that your hamster depends upon for security in its territory and for the alleviation of any stress. If all bedding is removed, it causes disorientation and anxiety in the hamster as it travels through trial of scent. Because of this, cleaning should consist of spot cleans every two to three days as well as partial cleanings with bedding changes so necessary to promote hygiene but at the same time to allow familiarity in the surroundings. Deep cleans should be done every two to three months in addition to these recommendations unless there appears to be certain health problems such as mites or some fungal infections, whereby more frequent cleanings are mandated.
All hamsters require water bathing for proper hygiene and grooming to keep their essential skin healthy and clean.
This is not true because water bathing causes discomfort in that it may cause hypothermia and extreme stress due to the inability of the hamsters in wet bodies to control their body temperature. Only that nature is suited for sand bathing is in existance in dwarf hamsters, and these be advantageous to the species by rolling in the sand to cleanse the fur of grease. The Syrian species would clean its skin efficiently by licking it. The Syrian species should never be water bathed beyond that which seeks drink. Water bathing causes the vital oils to be stripped from the coat and the skin may become dry and irritated. The pneumonia risk is greatly increased from respiratory distress met with while drying out the wet body.
Replacing all bedding every month is crucial to keep odors in check and maintain a healthy environment for your hamster's habitat.
This erroneous belief causes needless stress to the pet, who needs all the scent indicators he can get for mental health. The removing of all bedding causes stress due to territory and newly constructed nests which weaken the immune system. Instead, retain 30% of the old bedding when changing to keep odors and scents present and mixed with the new material. Odor control comes from daily spot cleaning of the urine areas and the use of absorbent beddings made of paper, which lock in the ammonia much better than the complete monthly bedding change.
Common household disinfectants are safe to use on hamsters' cages after rinsing and are effective in killing harmful bacteria without danger to health.
This is dangerously wrong, for residues of disinfectants cause respiratory distress among hamsters because their lung capacity is only 1/10 that of humans according to body size. Even perfectly rinsed surfaces hold residues of phenols or quaternary ammonium compounds which will be accumulated on the paws and fur during the cleaning process. The agents used instead should be vinegar-water solutions or pet-safe enzyme cleaners especially made for small animals. It is, however, advisable to air-dry completely before reintroduction, for vapors of chemicals will be intensified by moisture in enclosed habitats.
Regularly rearranging cages provides mental stimulation by creating new environments to stimulate your hamster's natural inquisitiveness and exploring instincts.
This misunderstands hamsters' psychology, as they are creatures of habit that map their environment through scent and memory. If there are sudden changes in layouts, it can cause disorientation, and produce stress, which manifests itself as unnatural bar chewing or overgrooming interests. True enrichment comes from an environment that is predictable, containing rotating toys in defined zones and foraging opportunities. Changes should be gradual, preserving the major landmarks such as nest sites, while introducing new elements to the periphery of the cage environment first allowing for comfortable investigation.
Conclusion
When developing a cleaning regimen for your hamster, its distinct qualities and habits must be taken into account. My shy Roborovski, for example, required less extreme spot cleaning than my bold Syrian. Observe how your hamster reacts after cleaning. Then switch cleaning techniques according to your hamster's individual temperament and responses.
Emphasize observation, not inflexible schedules. Pay attention to when your hamster grooms or sleeps to time cleanings perfectly. I learned that my hamster liked cleaning at midday when he was most deeply asleep. I found this less stressful than cleaning in the evening and disturbing his active hours.
Consideration should be given to the changing needs of your hamster over time. Young hamsters are more tolerant of experience change. My older hamsters needed higher temperatures when cleaned. Prepare for alteration of habits and routines as your pet ages or develops health problems over time.
Tell me the challenges you are having for some tailored feedback. You can contact me through my website with your hamster's specific situation. I have helped troubleshoot individual cases from temperature-sensitive hairless breeds to anxious dwarf hamsters needing special approaches.
External Sources
Frequently Asked Questions
How often should I completely clean my hamster's cage?
You should perform a full deep clean every 2-3 months to prevent stress from scent loss. Complete cage cleans destroy essential territorial markers and should only be done for medical issues like mites. Between deep cleans, focus on daily spot cleaning of urine zones.
What's the safest way to clean hamster urine stains?
Use a vinegar-water solution and UV flashlight for detection. The proper method involves:
- Identify spots with 365nm UV light nightly
- Apply diluted white vinegar (1 part vinegar to 3 parts water)
- Gently blot without scrubbing to preserve bedding
- Rinse area with damp cloth to remove residue
Do hamsters get stressed when their cage is cleaned?
Yes, improper cleaning causes significant stress. Sudden scent loss from complete bedding removal triggers disorientation and anxiety behaviors like bar-chewing. Minimize stress by retaining familiar scent markers through partial changes and maintaining consistent item placement in their habitat.
How frequently should I change the sand in a sand bath?
Sand bath maintenance requires:
- Daily sifting to remove waste
- Weekly deep cleaning with sun-drying
- Complete monthly replacement
- Transition periods mixing old and new sand
What cleaning products are dangerous for hamster cages?
Avoid household disinfectants containing phenols or quaternary ammonium compounds. These cause respiratory damage even when rinsed, as hamsters have sensitive lungs. Always choose pet-safe enzymatic cleaners or diluted vinegar solutions instead, ensuring thorough drying before reintroducing your hamster.
How should I clean a hamster's exercise wheel?
Proper wheel maintenance depends on material:
- Plastic: Wipe daily with damp cloth
- Cork: Weekly gentle scrub with vinegar solution
- Always rotate spare wheels during drying
- Check for sticky residue monthly
Why is spot cleaning better than frequent full cleans?
Spot cleaning preserves essential scent markers that provide territorial security while controlling odor at urine sources. This approach prevents the stress-induced immune suppression caused by complete habitat disruption, aligning with natural hamster behavior and wellbeing requirements.
What temperature should the cage be during cleaning?
Maintain 68-75°F (20-24°C) in temporary holding areas during cleans. Temperature consistency prevents chilling, especially for hairless breeds. Ensure the main habitat is fully dry and warmed before reintroduction, using ceramic heat tiles if needed for thermal stability.
How can I reduce odors between cleanings?
Effective odor control involves multiple strategies:
- Use highly absorbent paper-based bedding
- Spot clean urine zones immediately
- Provide adequate ventilation
- Maintain proper litter tray hygiene
- Avoid over-wetting during cleaning
Should I wash my hamster's nesting material?
Never wash nesting materials unless medically necessary. Spot clean only, as nests contain crucial scent profiles. Wiping down hard accessories like ceramic hides while preserving familiar bedding maintains security and reduces relocation stress significantly.